部署 Spring Cloud Pig
关于 Spring Cloud Pig
- 基于 Spring Cloud 2021 、Spring Boot 2.7、 OAuth2 的 RBAC 权限管理系统
- 基于数据驱动视图的理念封装 element-plus,即使没有 vue 的使用经验也能快速上手
- 提供 lambda 、stream api 、webflux 的生产实践
模块说明
pig-ui  -- https://gitee.com/log4j/pig-ui

pig -- https://gitee.com/log4j/pig
├── pig-auth -- 授权服务提供[3000]
└── pig-common -- 系统公共模块
     ├── pig-common-bom -- 全局依赖管理控制
     ├── pig-common-core -- 公共工具类核心包
     ├── pig-common-datasource -- 动态数据源包
     ├── pig-common-job -- xxl-job 封装
     ├── pig-common-log -- 日志服务
     ├── pig-common-mybatis -- mybatis 扩展封装
     ├── pig-common-seata -- 分布式事务
     ├── pig-common-security -- 安全工具类
     ├── pig-common-swagger -- 接口文档
     ├── pig-common-feign -- feign 扩展封装
     └── pig-common-xss -- xss 安全封装
├── pig-register -- Nacos Server[8848]
├── pig-gateway -- Spring Cloud Gateway网关[9999]
└── pig-upms -- 通用用户权限管理模块
     └── pig-upms-api -- 通用用户权限管理系统公共api模块
     └── pig-upms-biz -- 通用用户权限管理系统业务处理模块[4000]
└── pig-visual
     └── pig-monitor -- 服务监控 [5001]
     ├── pig-codegen -- 图形化代码生成 [5002]
     ├── pig-sentinel-dashboard -- 流量高可用 [5003]
     └── pig-xxl-job-admin -- 分布式定时任务管理台 [5004]
通过源码部署 Spring Cloud Pig
本文档教程基于 Spring Cloud Pig v3.6.2 版本部署
一、部署 Mysql
- 基于源码创建组件,填写以下信息:
| 内容 | |
|---|---|
| 组件名称 | 自定义 |
| 组件英文名称 | 自定义 |
| 仓库地址 | https://gitee.com/zhangbigqi/pig.git |
| 子目录路径 | db |
| 代码版本 | v3.6.2-1117 |
警告
这里使用了我的仓库地址,因为修改了一些默认配置,比如数据库密码、存储,如果你不想修改,可以使用原仓库地址
- 进入 Mysql 组件 -> 其他设置,修改组件部署类型为
有状态服务(Statefulset类型) - 进入 Mysql 组件 -> 端口,点击端口别名修改为
MYSQL并打开端口的对内服务。
信息
以上变量名和变量值可以根据自己的需求进行修改。如果其他组件依赖了 Mysql,依赖中的变量会注入到依赖了 Mysql 组件中,参阅通信变量注入
提示
修改以上配置后构建 MySQL 组件
二、部署 Redis
通过开源应用商店部署 Redis,在开源应用商店中搜索 Redis 并安装。
三、部署 Pig 后端服务
- 基于源码创建组件,填写以下信息:
| 内容 | |
|---|---|
| 组件名称 | 自定义 |
| 组件英文名称 | 自定义 |
| 仓库地址 | https://gitee.com/log4j/pig.git |
| 代码版本: Tag | v3.6.2 |
- 检测出多模块构建,进入多模块构建页面,勾选以下模块并创建。
- 创建后,删除每个组件的默认端口,为每个组件添加对应的新端口和端口别名并打开端口的对内服务,如下:
| 组件 | 端口 | 端口别名 |
|---|---|---|
| pig-register | 8848 9848 9849 | 8848端口别名: NACOS |
| pig-gateway | 9999 | 端口别名: GATEWAY |
| pig-auth | 3000 | |
| pig-upms-biz | 4000 | |
| pig-codegen | 5002 | |
| pig-monitor | 5001 | |
| pig-sentinel-dashboard | 5003 | SENTINEL |
| pig-xxl-job-admin | 5004 |
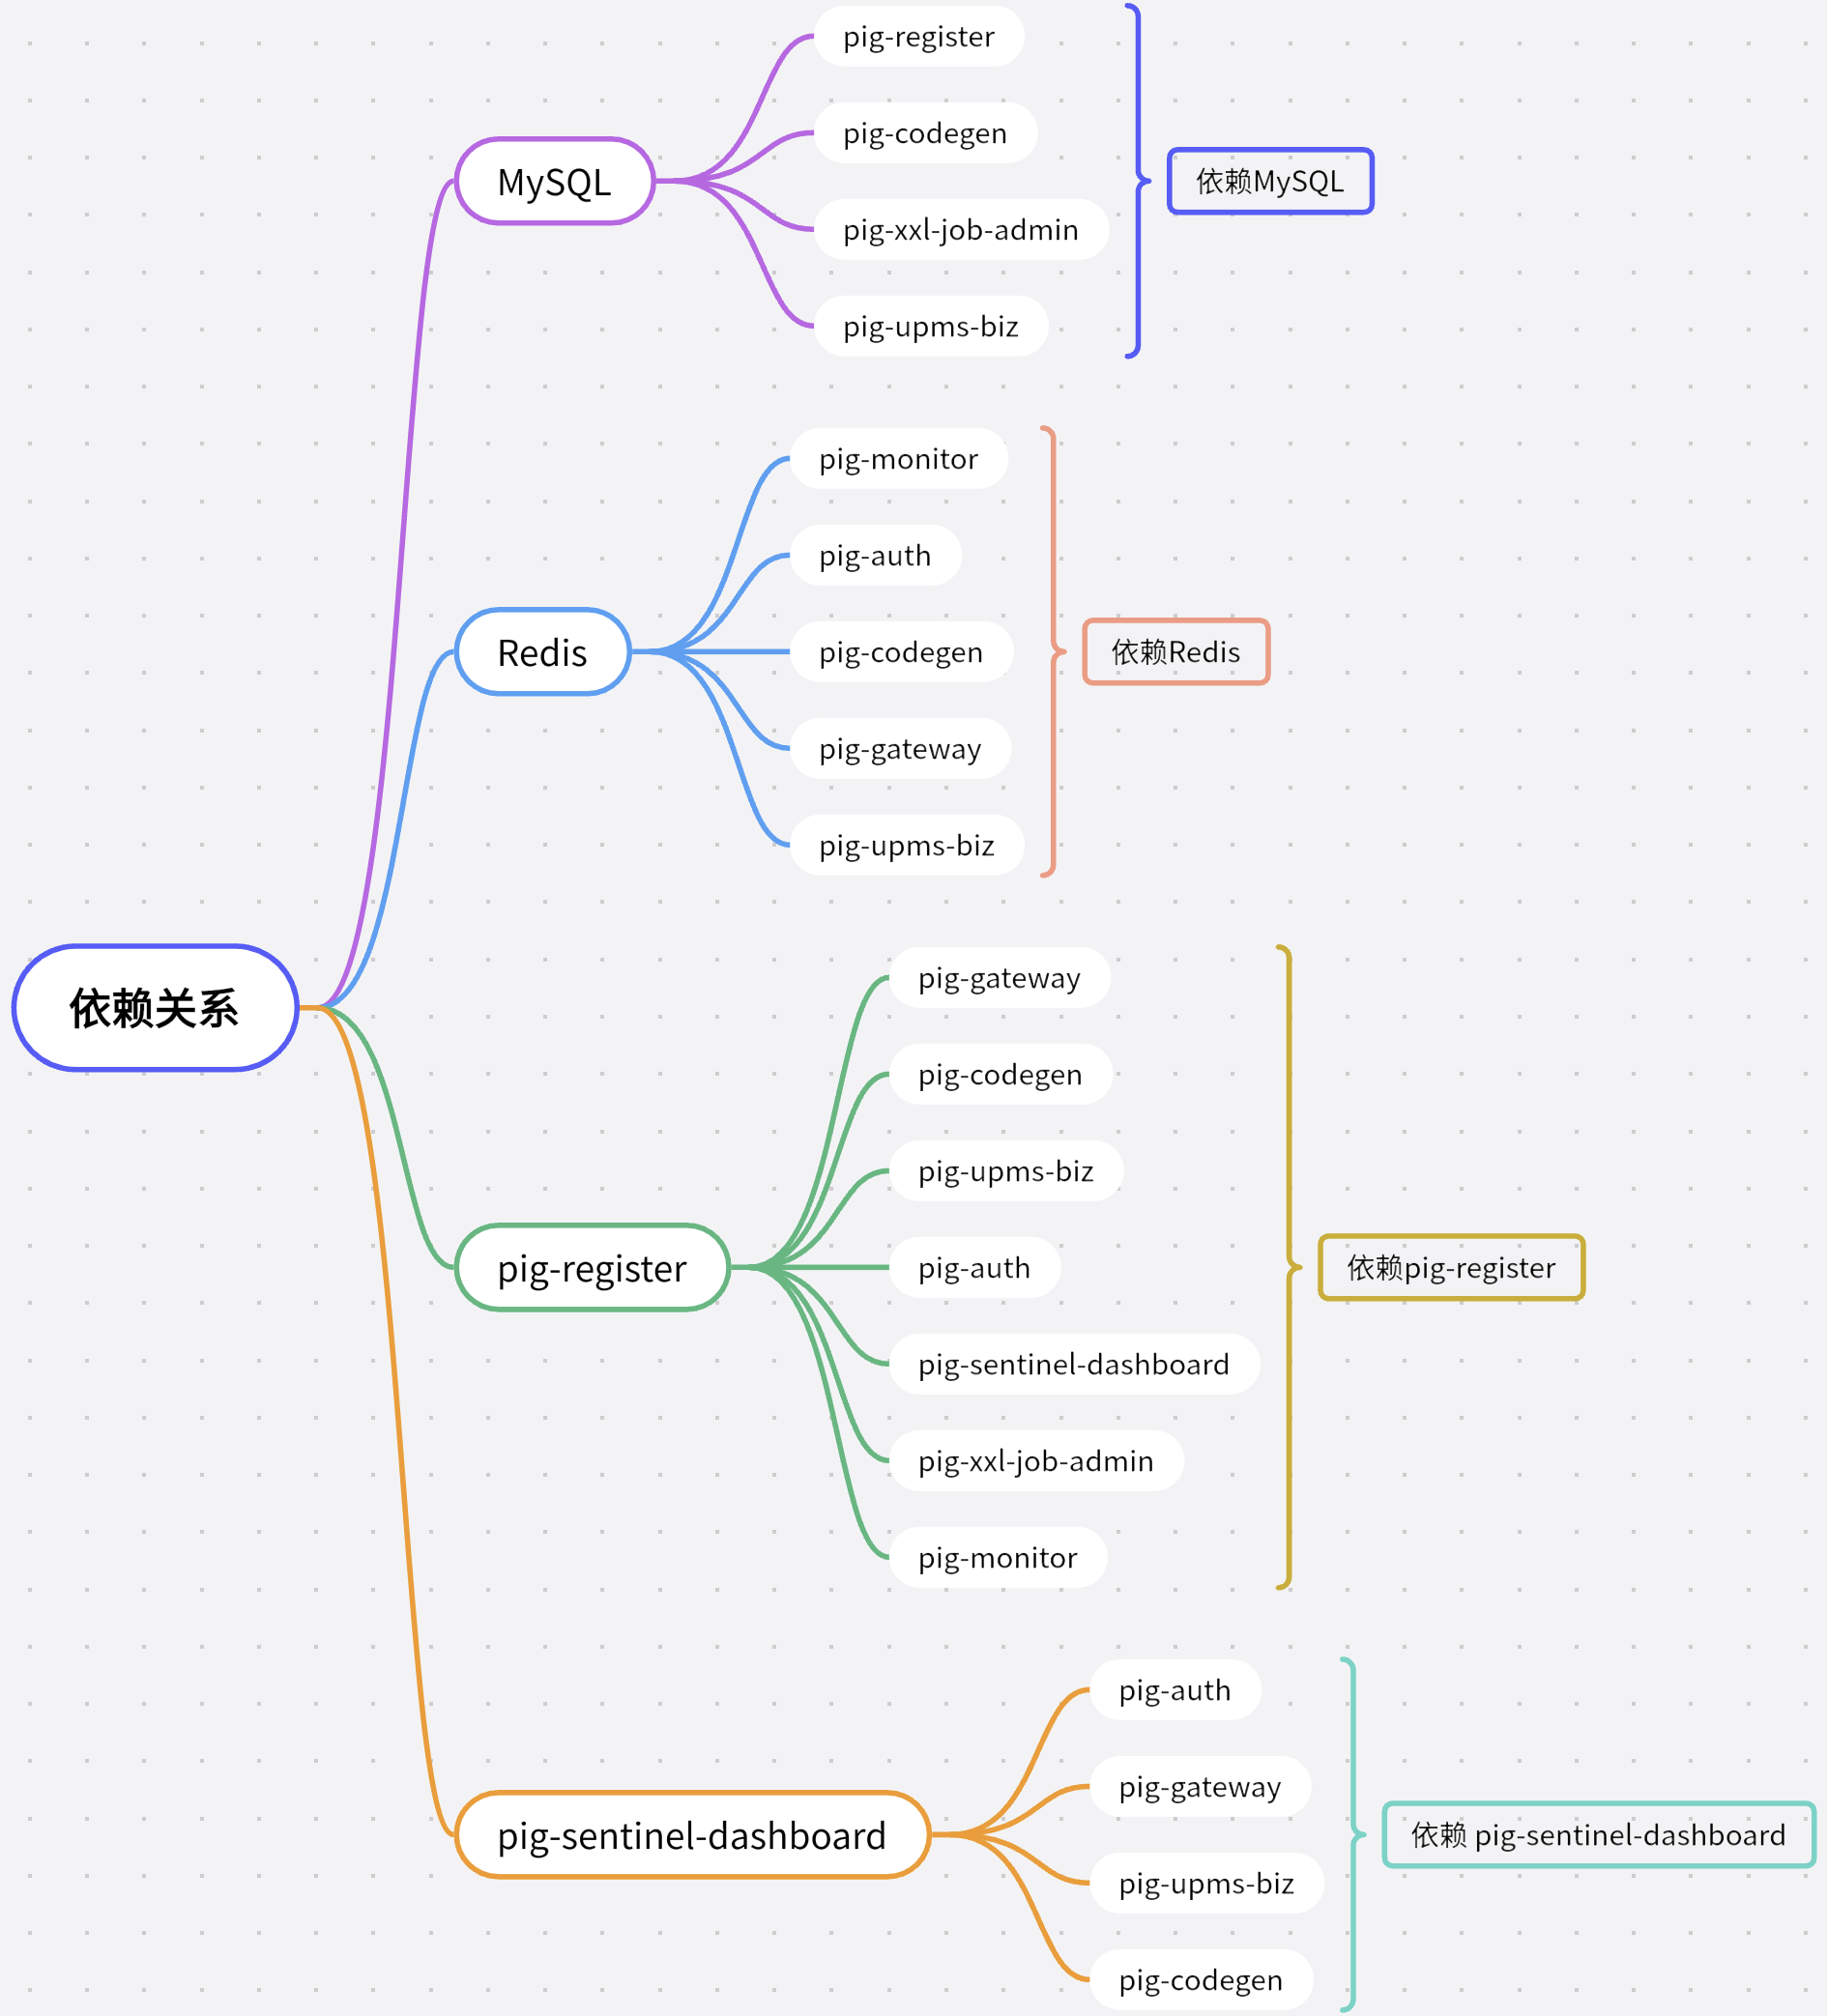
- 编辑依赖关系,切换到
编排模式拖动组件进行依赖关系建立。

- 进入
pig-register组件内 -> 端口 -> 打开8848端口的对外服务,访问 Nacos 并登录,默认用户密码nacos/nacos,修改以下配置文件内容:
# 编辑 application-dev.yml
spring:
  cache:
    type: redis
  redis:
    host: ${REDIS_HOST} #修改 redis host
  cloud:
    sentinel:
      eager: true
      transport:
        dashboard: ${SENTINEL_HOST}:${SENTINEL_PORT} # 修改 sentinel host

# 编辑 pig-codegen-dev.yml
spring:
  datasource:
    type: com.zaxxer.hikari.HikariDataSource
    driver-class-name: com.mysql.cj.jdbc.Driver
    username: root
    password: root
    url: jdbc:mysql://${MYSQL_HOST}:${MYSQL_PORT}/pig_codegen?characterEncoding=utf8&zeroDateTimeBehavior=convertToNull&useSSL=false&useJDBCCompliantTimezoneShift=true&useLegacyDatetimeCode=false&serverTimezone=Asia/Shanghai&nullCatalogMeansCurrent=true&allowPublicKeyRetrieval=true
    # 修改 mysql host 和 port

# pig-upms-biz-dev.yml
spring:
  datasource:
    type: com.zaxxer.hikari.HikariDataSource
    driver-class-name: com.mysql.cj.jdbc.Driver
    username: root
    password: root
    url: jdbc:mysql://${MYSQL_HOST}:${MYSQL_PORT}/pig?characterEncoding=utf8&zeroDateTimeBehavior=convertToNull&useSSL=false&allowMultiQueries=true&useJDBCCompliantTimezoneShift=true&useLegacyDatetimeCode=false&serverTimezone=Asia/Shanghai&nullCatalogMeansCurrent=true&allowPublicKeyRetrieval=true
    # 修改 mysql host 和 port
提示
更新除 Mysql 和 Redis 外所有组件
四、部署 Pig-UI 前端
4.1、基于源码创建组件,填写以下信息:
| 内容 | |
|---|---|
| 组件名称 | 自定义 |
| 组件英文名称 | 自定义 |
| 仓库地址 | https://gitee.com/zhangbigqi/pig-ui.git |
| 代码版本 | v3.6.2-1117 |
警告
这里使用了我的仓库地址,因为修改了一些默认配置,比如增加了 nodestatic.json web.conf,参阅 部署Vue、React前端
4.2、创建组件后,进入 pig-ui 组件内 -> 构建源 -> 源码构建参数设置,修改 Node 版本为 16.15.0,确定修改并构建组件
4.3、编辑依赖关系,切换到 编排模式 拖动组件进行依赖关系建立,将 pig-ui 依赖 pig-gateway。
4.4、进入 pig-ui 组件内 -> 环境配置 -> 添加配置文件,添加以下配置文件:
- 配置文件名称:自定义
- 配置文件路径:
/app/nginx/conf.d/web.conf - 配置文件内容如下:
server {
    listen 80;

    gzip on;
    gzip_static on;     # 需要http_gzip_static_module 模块
    gzip_min_length 1k;
    gzip_comp_level 4;
    gzip_proxied any;
    gzip_types text/plain text/xml text/css;
    gzip_vary on;
    gzip_http_version   1.0; #兼容多层nginx 反代
    gzip_disable "MSIE [1-6]\.(?!.*SV1)";

    # 打包好的dist目录文件,放置到这个目录下
    root /app/www;

    # 注意维护新增微服务,gateway 路由前缀
    location ~* ^/(code|auth|admin|gen) {
      proxy_pass http://${GATEWAY_HOST}:${GATEWAY_PORT};
      #proxy_set_header Host $http_host;
      proxy_connect_timeout 15s;
      proxy_send_timeout 15s;
      proxy_read_timeout 15s;
      proxy_set_header X-Forwarded-Proto http;
      proxy_set_header X-Real-IP $remote_addr;
      proxy_set_header X-Forwarded-For $proxy_add_x_forwarded_for;
    }

    # 避免端点安全问题
    if ($request_uri ~ "/actuator"){
        return 403;
    }
}
4.5、删除默认端口,新增 80 端口并打开对外服务。
4.6、更新组件并访问 pig-ui 进行验证。
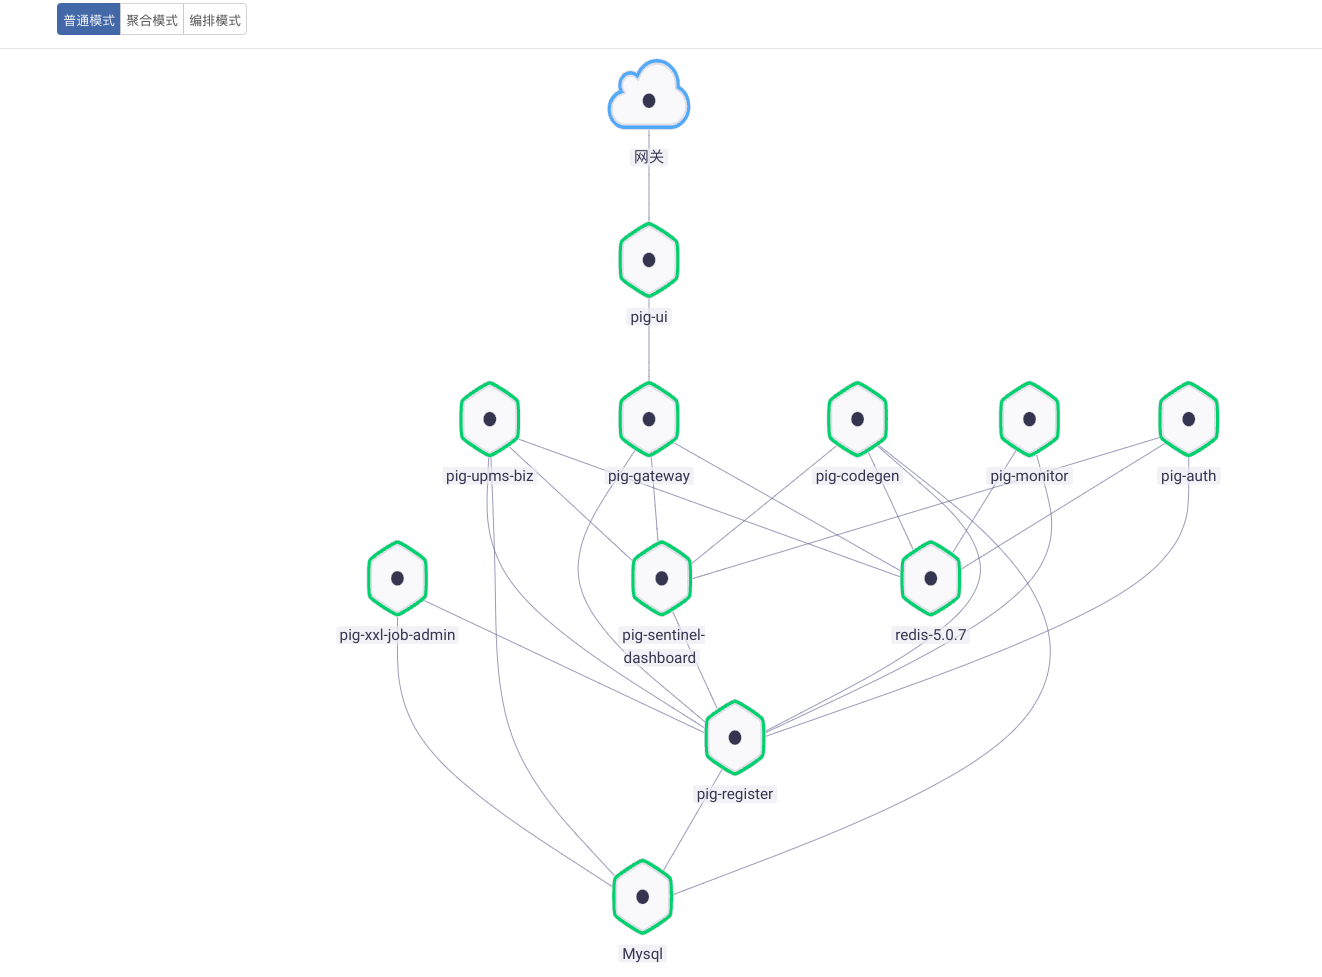
最终拓扑图
